CHILD
Adirondack / Muskoka Chair Plans
Materials List
1/2" x 5 1/2" (13mm x 14cm) redwood or cedar fence boards or pine boards. Four, 5' (1.53m) boards should
make one chair depending on knots and layout.
8, 3/16" x 1 1/4" (5mm x 32mm) brass bolts, nuts and 16 washers.
50, #4 x 1" (2.54cm) brass square drive wood screws
1" x 1" (2.54cm x 2.54cm) squared graph paper flip-chart pad (available at Staples Business Depot)
Parts List
Part
Description
Quantity
Size(standard)
Size (metric)
A
Side panel
2
19 3/8" x 2 5/8" x 1/2"
49.3cm x 6.7cm x 13mm
B
Bottom back support
1
9 1/2" x 1 3/8" x 1/2"
24.1cm x 3.5cm x 13mm
C
Front seat slat
1
9 1/2" x 1 3/8" x 1/2"
24.1cm x 3.5cm x 13mm
D
Front leg
2
10" x 2 1/2" x 1/2"
25.4cm x 6.4cm x 13mm
E
Back support
2
13"x 1 3/4" x 1/2"
33.0cm x 4.5cm x 13mm
F
Arm support
2
3 3/8" x 2 1/8" x 1/2"
8.6cm x 5.4cm x 13mm
G
Arm
2
15 5/8" x 3 3/4" x 1/2"
39.7cm x 9.5cm x 13mm
H
Top back support
1
9 1/2" x 1 7/8" x 1/2"
24.1cm x 4.8cm x 13mm
I
Center back slat
1
17 3/8" x 1 3/8" x 1/2"
44.2cm x 3.5cm x 13mm
J
Second back slat
2
17 1/4" x 1 3/8" x 1/2"
43.8cm x 3.5cm x 13mm
K
Third back slat
2
17" x 1 3/8" x 1/2"
43.2cm x 3.5cm x 13mm
L
Outer back slat
2
16" x 1 3/8" x 1/2"
40.7cm x 3.5cm x 13mm
M
Seat slat between legs
3
9" x 15/16" x 1/2"
22.9cm x 2.5cm x 13mm
N
Seat slats
6
9 1/2" x 15/16" x 1/2"
24.2cm x 2.5cm x 13mm
O
Back seat slat
1
9 1/2" x 1 13/16" x 1/2"
24.2cm x 4.7cm x 13mm
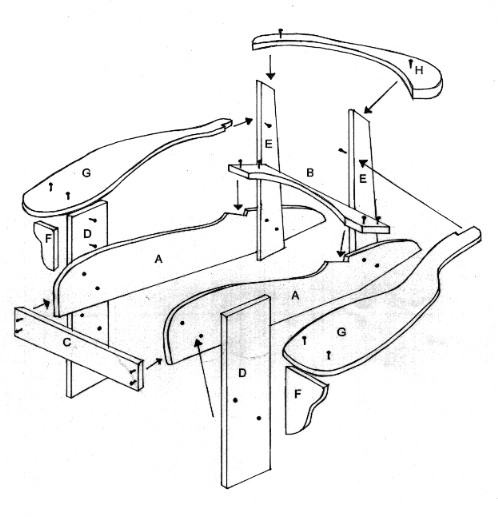
Instructions:
The parts diagram is 1 square equals 1 inch. Copy all template pieces to the 1" x 1" (2.54cm x 2.54cm)
graph paper, as shown in the plans. Double check the dimensions from the sizing chart above. Cut out all templates,
on the INSIDE
of the lines shown, and trace or glue onto hardboard for permanent templates.Label all pieces. Trace all templates
onto the final stock of pine or cedar, and cut each one out with a sabre, table, or band saw. A taper jig on the
table saw, works best for the back slats and back supports E. A shop built sled is the quickest, easiest and safest
taper jig. Use a scrap length of 6" (15.8cm) wide plywood, longer than the back slats, and fasten clamps at
each end. Line up the pattern line to the edge of the jig, and run it through the blade.
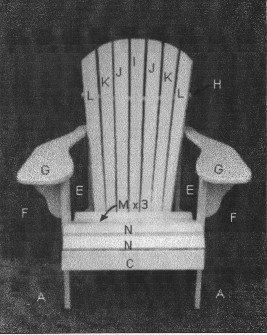
For all back slats, cut to the rough dimensions of part I, the longest slat. Then trace on template I, and taper
the one side for all parts I, J, K & L. The templates for J, K, & L can be traced onto the tapered stock,
so all parts are the same width at the bottom. Only one template of each is necessary. Just flip each over for
the opposite direction of the curve. Use whichever top pattern you choose from the templates. You can make the
slats the same length as the original I, J, K & L, to give the same curved top appearance, or arrange to your
taste.
Using a 3/16" (5mm) bit, drill the holes for the legs and back supports.
If you have a jointer/planer, you may want to clean up all straight edges. Any curved surfaces should be sanded
with a drum sander before rounding over all outside edges, with a router or sandpaper.
If you are painting the chair, it is best to prime all surfaces first before assembly, to ensure longer life against
moisture. Use an oil based paint like Varathane Colours, for the final coat.
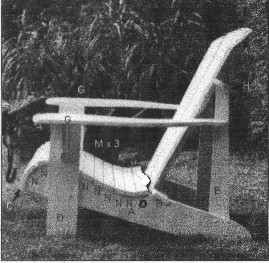
Begin assembly by pre-drilling and screwing the bottom back support, part B, to the slot in each part A, the side
panels. Leave a 1/4" (6mm) overlap on each side. Use 1screw on each side of part B. Next attach the front
slat C, with 1 screw on each side, to the front edges of parts A, flush with the bottom edge, again with a 1/4"
(6mm) overlap. This will give you a carcass to work with. Check for square by measuring corner to corner, both
ways.
Next, bolt on the front legs D, on the OUTSIDE of parts A. Use washers on both sides. Tighten being sure the legs are parallel
with each other. Be sure the bottoms of the side panels A, rest flat at the back. Bolt on the back supports E,
on the INSIDE
of side panels A, again being sure they are parallel to each other.
With two screws, attach the arm supports F, centered flush with the top of the front legs D. Draw a line at 9 3/4"
(24.8cm) up from the bottom of the back supports E, and screw the arms G in place, as they rest on the front leg
supports. Double check to be sure the arms are parallel to the ground. Put 2 screws through the arms into front
legs D, and 1 into supports F. Screw 1 from the inside of parts E, into the notch at the back of the arm. There
should be 8 1/2" (21.6cm) between the arms.
Screw on the upper back support H, centered on the tops of parts E, flush at the front. The back pieces can now
be assembled, starting with the middle slat I, centered at the top on part H, and at the bottom, in the curve on
part B, overhanging 1/8" (3mm). Use one screw at the top and bottom of each slat, being sure not to set the
screws too deep.
Next, screw on slats L, flush with the ends of part H, and the curve in B. Then scew on slats J and K, fanned evenly
between I and L. You may want to pre-drill holes in each slat and put in place with a small nail temporarily, to
balance the distance between slats, before screwing in place.
Attach part O, the back seat slat. You may have to adjust the angles
of the template pattern, to fit properly to the back slats. The seat slats can now be assembled and attached using
one screw on each side. Evenly space all slats N, with 2 in front of the legs D, and 4 behind. The three slats
M, are placed between the legs, and spaced to match the others.
The chair is now assembled, and ready for finishing.Hopefully, it willbe around for years to come, and used by
the next generation of little ones.
Enjoy!!!
Phil Barley
|
www.plansinwood.com |
|
 |
|